I bought a 1966 light green 2 door 122S about 14 years ago (to go with the other three 120's that I had.....

I started this project around 10 years ago, having been inspired to build it as a 'race car' after seeing Andrew Whites 122 at Targa Tasmania (on display with all the other entrants at Launceston's Silverdome).

Since all 18 month projects always seem to take at least a decade to get together, I am now at the stage of having something to show for my labours, though it is still not quite finished (but is at least starting to look like I am close(ish) to completion......

I started by stripping the car to a bare shell and setting it up on a homemade rotisserie.

This was a far as I got for a few years, as I first finished off the 142 that you can see in the background, and also my 122S wagon. I also setup a 240 as a rally car that I competed in the Historic Rally Association standard car class with. Lots of fun, then covid came along. This finally got me back to the 122S rally project.. I upgraded the rear suspension pickup points to that of the 1968 onwards cars, the bits having come off an almost totally stuffed 1968 wreck that I acquired many years before.

I strengthened the chassis at the front and rear, and had Damon at Geelong Motorsports Fabrication install a 'national spec' roll cage into the car, i was very pleased with the result.

I managed to get a hold of an 1800ES rear end and associated front end bits, and they are now in the car, giving me four wheel disc brakes.

Progress on the car has now advanced to the following:

I got the engine block, crankshaft and flywheel back from North Geelong Engines last week, and have been putting the engine together. I have used forged pistons, Tinus tuning connecting rods and their rally cam, steel timing gears etc. Head has been ported (by me ?) and using 46 mm inlets and 38 mm exhausts.

Hopefully the next few days will see it installed in the car.

Congratulations on the progress, have had 3 122/P1800E and all 3 had cracks where the lower wish bone is secured to the cross member. worth some attention.

    Massey165

    Congratulations on the progress, have had 3 122/P1800E and all 3 had cracks where the lower wish bone is secured to the cross member. worth some attention.

    https://cdn.ozvolvo.org/uploads/V45UKZHY38EN/img-4118-jpg.jpg

    Thanks,

    I totally agree, generally there are a few cracks in these cross members. I always start by getting them sand blasted, that way you can easily see what you've got yourself into. In my case, I had an uncracked one with un-bent shock towers as well. I then reinforced the shock towers, put some braces in, and added some welds around the various parts of the cross member.

    Hopefully this holds up alright, if not, I still have three spare cross members to play with!

      17 days later

      Latest update on progress....

      I have done most of the engine assembly, and installed the motor in the car. I have started the install on the oil cooler setup, and will shortly put in the radiator / carbs etc. As you can also see, some wiring has gone in too.

      I will be using SU HIF7 carbs (ex 4.2 litre Jaguar, approx 1976 (ish). I have also booked a day on a dyno for tuning in early April, so I need to get my skates on!

      I have also finished making the exhaust system (2 inch mandrel bends etc), which I TIG welded together.

      The TerraTrip probes are also in the front wheels (I prefer to have two probes incase one of them fails. They are the coils hanging under the outer wishbones...

      Still have a few more weeks to get the car wiring finished, and a few other jobs done (some brake lines and also fuel lines as well).

      Engine bay looks very impressive, where did you get the Head studs.

      Thanks!

      The head studs are ARP, I got them from https://vp-autoparts.com/en/artiklar/stud-kit-cylhead-arp-b18-20.html

      They are certainly nice and smooth to torque up.

      Cheers,

      Richard.

      Another beautifully clean build from you.

      Those ARP kits for B20s might not be available for much longer - the ARP website only lists stuff for 5-potters now. If VP has stock, get them while you can.

      Thanks Major Ledfoot!

      I have also bought stuff from Tinus Tuning in the Netherlands (Rally Cam and fancy connecting rods, also with ARP bolts). I have found Ben Flierman to be a totally reliable and smart guy to deal with, he also lists ARP bolts on his website (you may need to use Google translate as much of his website appears to be in Dutch, which is not too big a drama). You can also contact him via email on info@tinustuning.nl , he is very proficient in English (apparently he was even born in New Zealand!).

      I wonder if there may be some other more common type of engine that also uses the same ARP head studs as required for the B18/B20 ?

      Cheers,

      R.

      I have been enjoying seeing the work you are doing on the 122S, it will look amazing once finished.

      My project has been moving along lately with it being stripped down ready for body work and repaint. In relation to your homemade rotisserie, what would be the height to the pivot point and the drop to the attachment front and rear? Any information would be much appreciated.

      Thanks. 

      Hi Adrian,

      Thanks for the positive feedback.

      Unfortunately I ditched my homemade rotisserie, space issues etc, I should have offered it up on OZVolvo, but was in a mad cleanup / tip mode.....

      You will probably have to do an approximate scale type measurement from the early photos in this post. The only problem that I had with my rotisserie was that the car was quite bottom heavy, so I would suggest reducing the length of the height of the pivot point relative to what I used. I got over the problem by kneeling on the edge of the body to force it up into whatever position I wanted to put it into, not really a big deal, but a small modification to that distance would certainly help it. At one end of the rotisserie (the rear end), I used 1/4 inch thick steel pipe, approx 2 inch diameter, this pipe (and another one rotating inside it were then drilled with 12 mm holes, 90 degrees relative to each other, and 2 inches further along, i did the same thing, but rotated the holes 45 degrees relative to the first set. The outer pipe was welded to the 'A' frame, and the inner pipe welded to the frame that bolted to the car. I bolted the part that attached to the car to the bumper bar attachment points. Anyway, all this means that you have a 45 degree angle setup (8 positions) around a circle. I found this enough. I used an old cylinder head bolt as the locking pin.

      Hope that this helps, and best of luck with you project!

      Cheers,

      Richard.

      @arebee, thanks for the information, have taken note of your comments and will start to sketch one out when I am next home on break. Your photos at the start will be useful to lay-out a plan.

      9 days later

      As the booked day on the dyno draws closer, further progress (fortunately) has been made. All the brake lines and clutch lines are now in. The heater unit has been cleaned up and installed. The only bit of the cooling system that still needs to be installed is the cooling overflow bottle. The usual method of attaching it to the side of the radiator (into the tapered fastener) was no longer possible due to where I put the oil cooler lines. This means that I will have to fabricate a mount and attach it nearby, should be easy enough. The new radiator is a triple core unit obtained from Nordicar in the Netherlands.

      The brake lines are 'Cunifer', a copper (Cu) /nickel (Ni)/ Iron (Fe, ferrum)) alloy. I think that this stuff is better than stainless steel in a rally car due to the work hardening that can occur with stainless. Never been a huge fan of straight steel brake line due to corrosion issues. Also installed an adjustable brake pressure limiter to the rear brakes, this I installed just above the brake master cylinder. The distributor that I have for the car is a bluetooth 123 system, which I'll probably install in the next few days.

      As you can see, still got some wiring to do. The 6 pole isolator switch is located between the driver / navigator seats, the fuel system is installed, but afterwards, I realised that I forgot to put in a filter?. Luckily, that is a trivial problem to correct. The battery is located in the boot as well.

      The pressure equalising system that I have used is made up of a small see though petrol filter connected to a one way fuel valve (air in, no fuel out.....). The wire dangling out of the old fuel filler spot is where the reversing light will be fitted.

      Hopefully I will have the car actually running in the next few days, followed by some basic running in, then the day on the dyno....... I've no idea what sort of power it might produce, but given that a B20 is supposed to be around 118 bhp (at the flywheel), with all the work that I have done to the engine, I'd be hoping for at least 119 bhp!

      I'll probably not get all the rally specific mods done prior to dyno day, but they are not the highest priority right now...

      10 days later

      Well, I have finally got the car running, not perfect by any means, but good enough for now... I thought that it would take a 'few' days to get it running, and ended up being around 10 days... Pleased to say that the exhaust sounds good. Currently running the car without air filters whilst in the workshop, and will have to make up some kind of bespoke setup to avoid contact with all the bits and pieces that are nearby the carbs.

      Naturally, I encountered a few problems, and still have many minor issues to deal with. One problem was that the thermatic fan is working in the wrong direction, should be a simple wiring fix, I'll just consult the manual (Davies-Craig). I also discovered that the electric fuel pump wasn't working either, which is a bugger, but in the interests of sanity, I just rigged up a mechanical pump, and have temporarily gone with that until I can organise a replacement..

      I also have discovered a few wiring mistakes that I have made generally, and after popping a few 25 amp fuses, will be forced to fix the problem rather than ignore it!

      One problem that I had was attaching the thermatic fan to the new three core radiator, I ended up putting four holes in it, which wasn't great, I managed to solder up three of them, but the fourth one has proven to be elusive. I will patch this radiator up (hopefully), and use it in another one of my cars. To get the car running, I took a standard two core radiator our of my other 122S, and swapped it in, no problems.

      At this stage, still booked in for some basic carb sorting on the dyno this Wednesday. The plan at this stage is to get the engine running well enough to do some proper running in, and I may then follow up with some final performance tuning, we will see what happens....

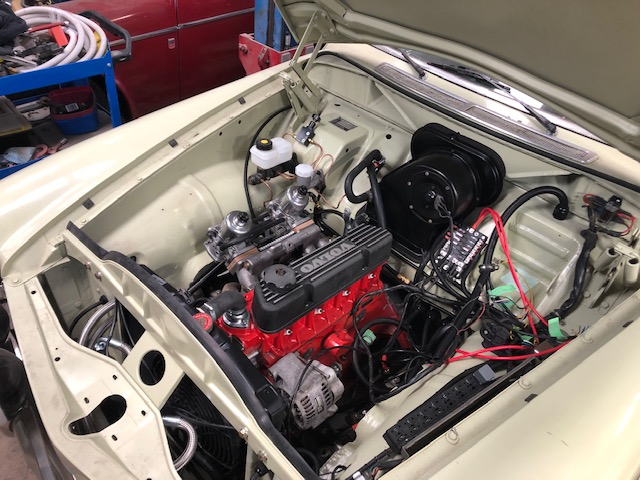
      After finally getting the engine started (and technically going.......) I managed to keep my appointment with Darren at Geelong Carburettors.

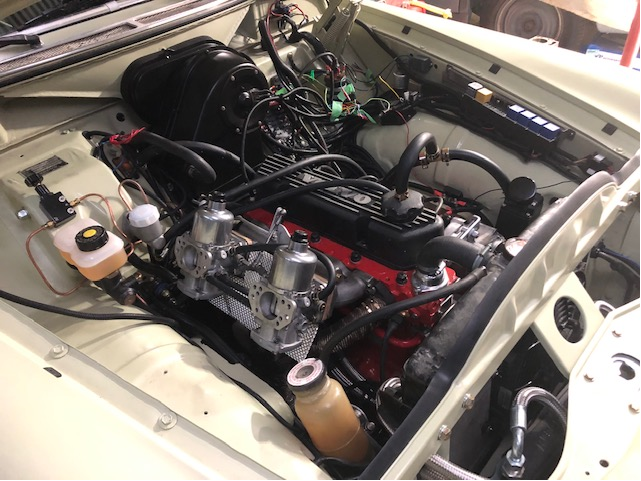
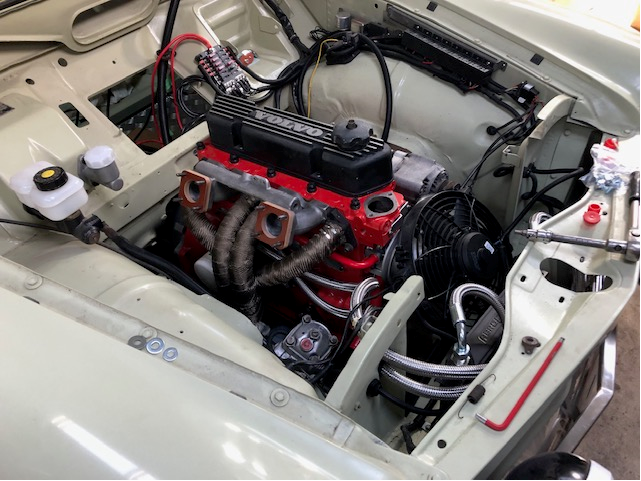
      Whilst I technically managed to get the car running, it wasn't running very well at all. As it happens, all I had wrong was the ignition timing, the way that I had the carbs (SU HIF7's) plumbed up, the advance curve (123 ignition) as well as some minor mechanical adjustments! The result is that the car now sounds fantastic, starts easily, and runs relatively smoothly. The car is now setup for the running in stage, and I will be doing this over the next few weeks, as well as setting up some air cleaners for it, and debugging some electrical (not engine related) gremlins. I will also be fitting the Terratrip and the associated rally stuff (extinguishers, map reading light, 6 point Sparco seatbelt harnesses, etc.

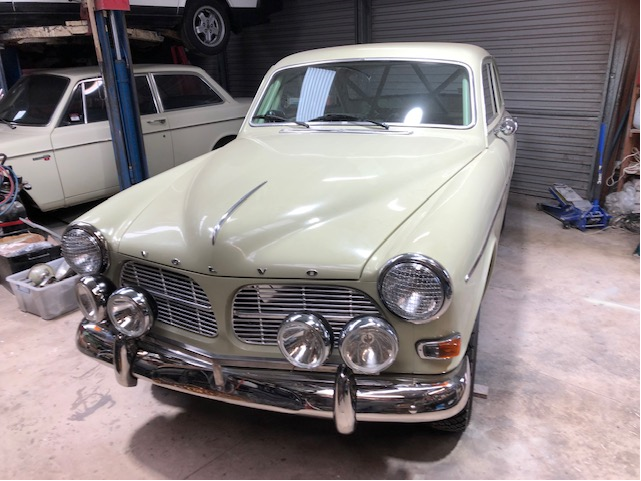
      As you may be able to see from the photo below, I have used the Lock and Load system for attaching the car to the trailer, very easy to attach a car safely to a trailer.

      By the way, I swapped some basic road wheels on the back of the car as I didn't want any unnecessary wear to occur on the new rally tyres.

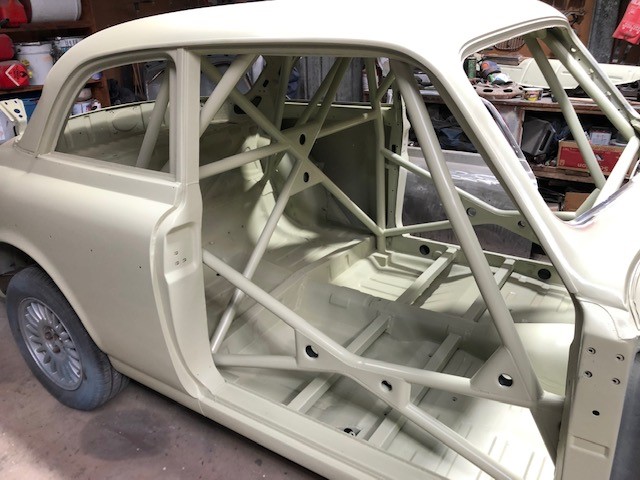
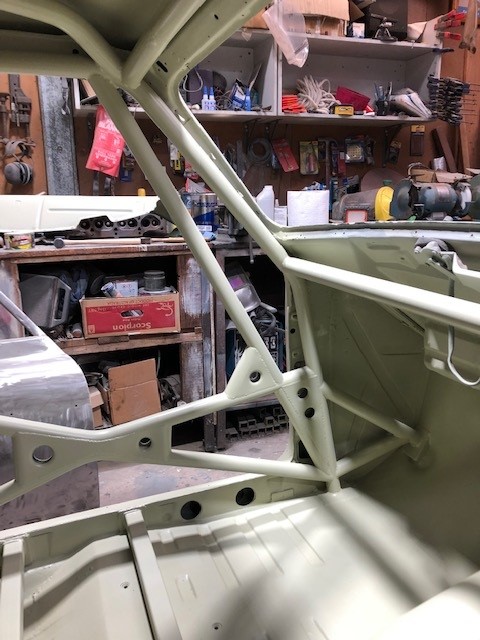
      I have taken a few shots of the interior of the car to give readers some feel for how it is going to turn out. Please ignore the dangly wiring under the dash etc., it is yet to be properly sorted. One of my pet peeves is the presence of an untidy rats nest of wires inside the cabin!

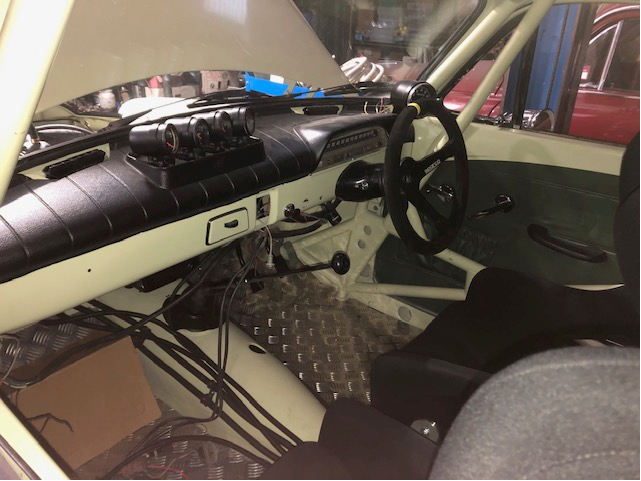
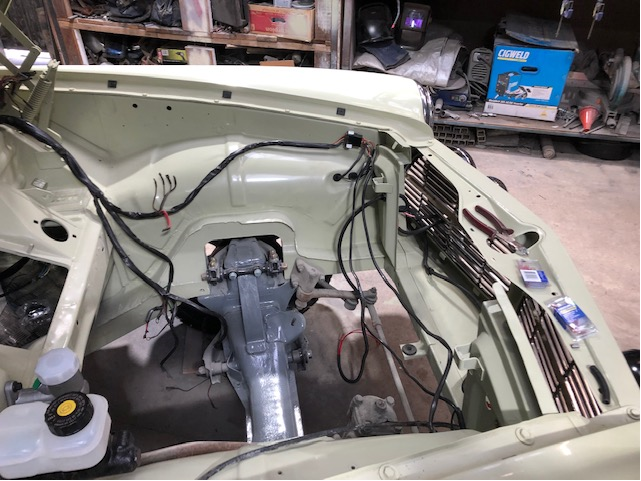
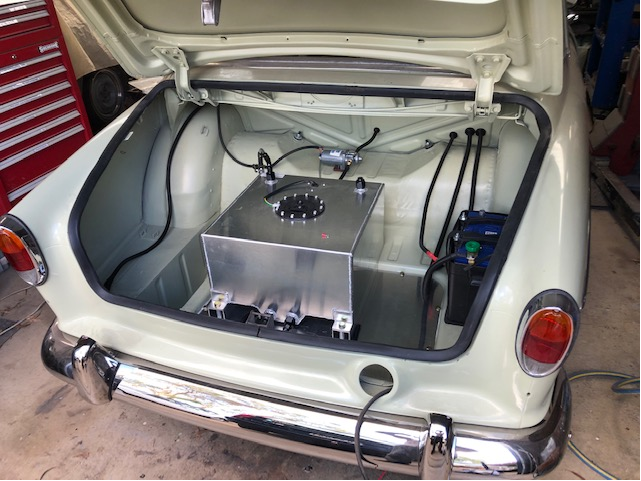
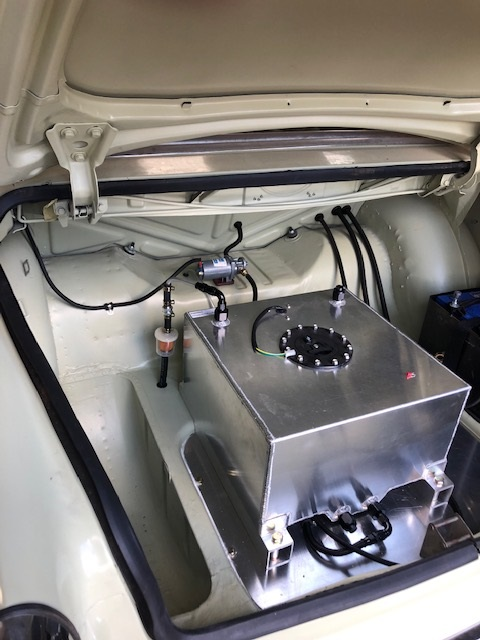
      Speaking of an untidy rats nest of wiring (all my own work! ?) the temporary mess near where the battery used to go is the last minute instrument wiring put in this morning prior to the engine sorting.

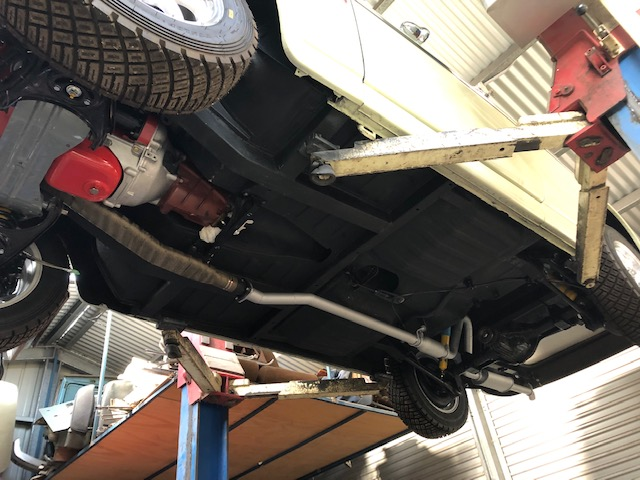
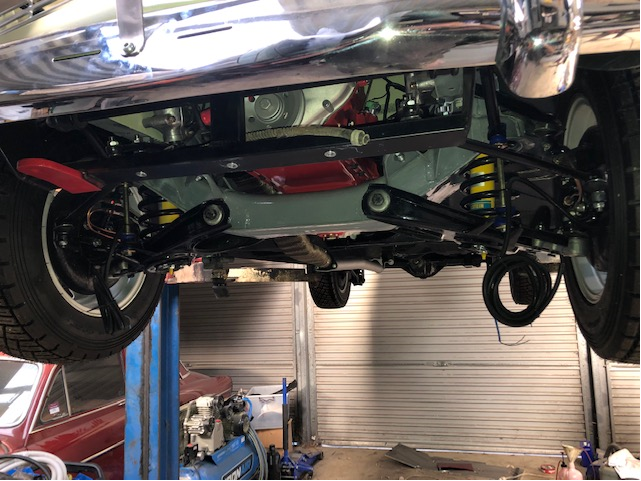
      I do have one question for the technical cognoscenti, I have found that whilst I have been able to bleed the front brakes (originally the dual L split circuit now altered to a simple front / rear split), I can't seem to be able to bleed the rears..... I have checked it all for blockages, none found, even in the calipers), and was wondering about the behaviour of the pressure limitation device (also not blocked, with fluid appearing on the outlet side of it, indeed fluid is all the way to the rear axle... I am temporarily flummoxed about this..

      Quality job as always! Well done!

      Re: the brake bleeding, you say you're getting fluid to the rear axle, but not through the rear brake calipers? I assume it's getting TO the rear calipers (it is rear disc, not drum, right?) but just not coming out the bleeder screw? One thing I can think is if the calipers were disassembled, is it possible the outer half of one was accidentally swapped with the inner half of the other? This could mean the cross-over where the O-ring between the two halves is misaligned. Seems like fluid would still come out the bleeder though but not sure on that. Edit: this is just a theory - not sure whether it would make a difference if the halves were interchanged, but I assume maybe the cross-over hole is towards the top or bottom of the caliper, not directly in the centre.

      Thanks Greg,

      I also put a clear poly tube up to the inlet of each caliper (after removing the hard line), and can easily blow air through the caliper (with the bleed nipple removed), indicating that there is no blockage. I am now starting to wonder if I wasn't contorting my face in the appropriate manner in order to succeed!

      I wonder if some material has become stuck in the master cylinder (How? What? Where???) that is causing a temporary blockage. seems most odd, I think that I will try a gentle (and maybe not so gentle) reverse pressure to see if I can get a flow in the reverse direction..

      Any sane or crazy ideas most welcome!

      I find sometimes just letting gravity start the fluid flow works. Open the rear bleed nipple and let it sit for a while. Minutes to an hour. When fluid drips out then proceed to bleed. This tend to remove the need to bleed the master cyclinder itself at the outlet pipe.

      The technical reason is that the rear circuit can rely on fluid being in between the front and rear piston on the master.

      Pressure bleeding by applying positive pressure on to the fluid in the reservoir works as well.

      But until you can get fluid just dripping through it will be much harder to actually bleed.

      Thanks Dave,

      I'll try that one out today!

      Cheers,

      Richard,

      Update on the rear brake bleeding problem.........

      I tried Dave's suggested method, but it didn't work on my car, which clearly indicated that I had truly buggered something up....

      With the assistance of my Son, (who sat in the car whilst it was up on the hoist), I worked backwards, then forwards through the entire rear brake line setup on the car (the main brake line is internally routed in the cabin).

      I made up a test bit of tubing to attach to each section of the brake system (in turn), and finally found the problem, I had somehow misaligned one of the brake lines in a stainless steel AN 3 though firewall fitting, leading to an inadvertent blockage. Mea Culpa!

      I also checked the valve clearance, and it was also way off, reset them, and the car sounds even more impressive. Still starts quite easily, and miraculously, still no over-run on switching off the engine, which I attribute primarily (though may be wrong) to the reshaped combustion chambers.

      Just need to get the electric sorted, then get the car run in...