Volvo 240 Bonnet Release Cable Fundamentals & Maintenance Tips
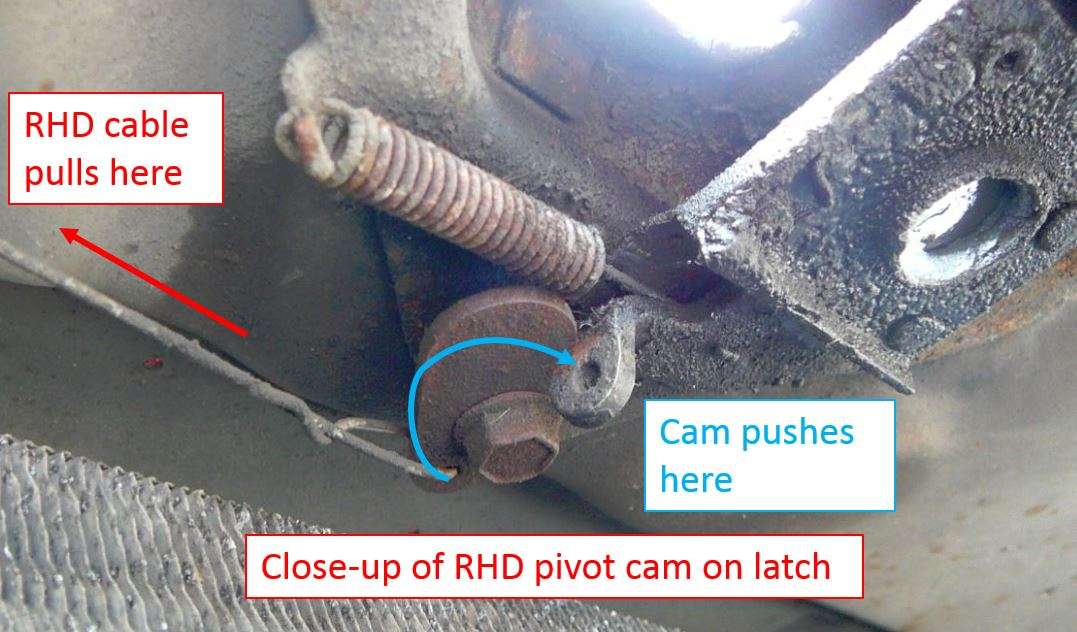
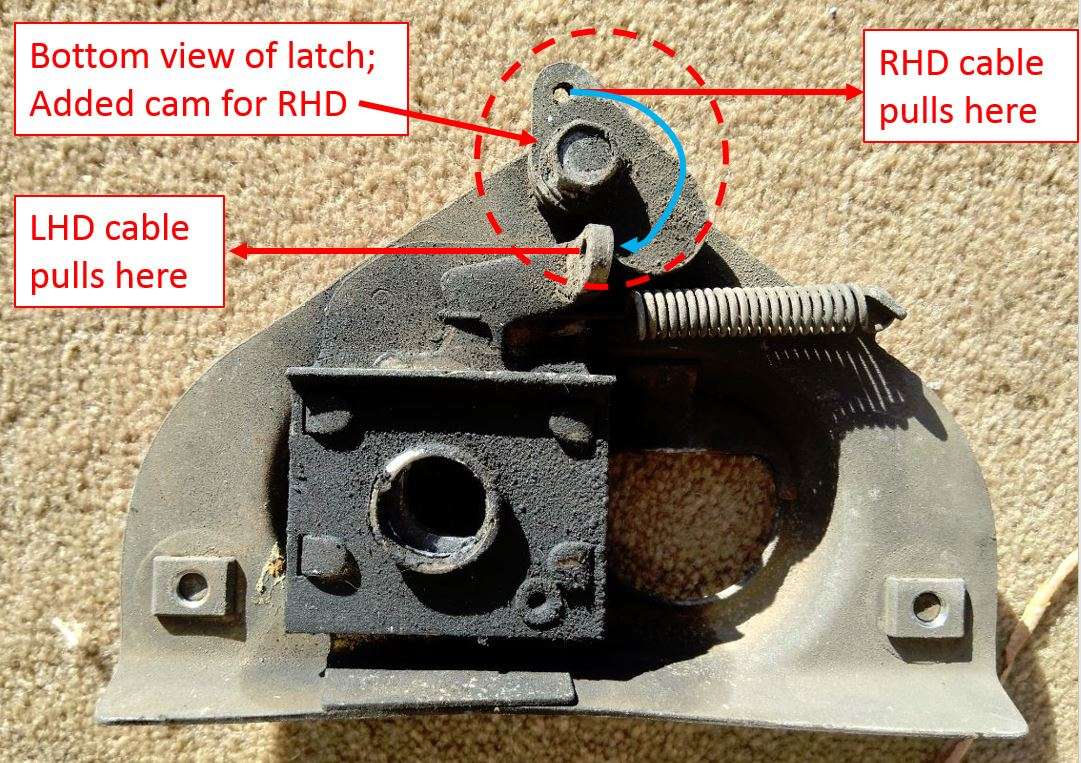
With the youngest Volvo 240 now over 25 years old, many owners are experiencing problems with the bonnet release cable requiring high pull efforts to release the bonnet latch. In extreme cases, the bonnet cable can become dislodged from the locking grommet in the dash panel resulting in the cable not releasing the latch at all. In most cases, high efforts are due to corrosion and lack of lubrication. On right-hand-drive (RHD) cars, Volvo used the same latch mechanism as LHD, but with an added cam to enable the cable to pull from the right side of the latch instead of the left side. This saved engineering expenses in that the bonnet latch didn’t have to be re-designed for RHD. However, the additional cam mechanism required for RHD is hidden under the front end panel behind the latch and is difficult to access when lubricating the latch mechanism. Therefore it often goes unnoticed and neglected. In the best case, the efforts would be higher on the RHD cars, and worst case, the cam can seize resulting in a non-functioning bonnet release. The early 140s have the bonnet release cable on the left side for all markets (LHD and RHD) but I guess moving the RHD cable to the driver’s side was a convenience feature. Some modern cars still keep the cable on the left side for all markets, but nowadays people don’t ever open the bonnet, do they?
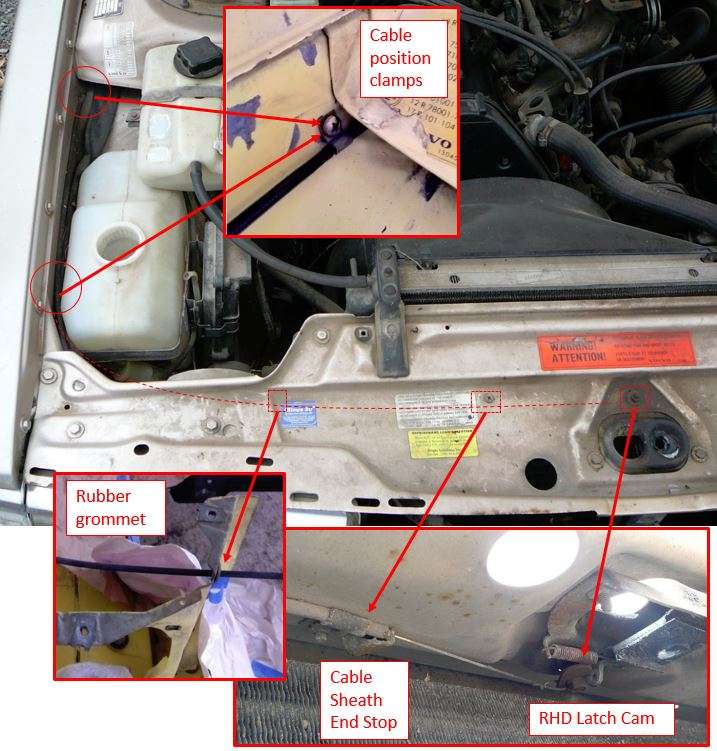
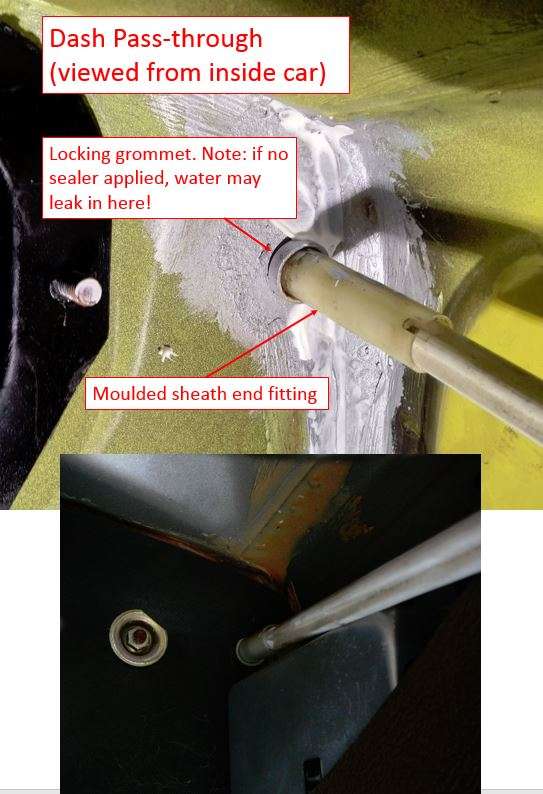
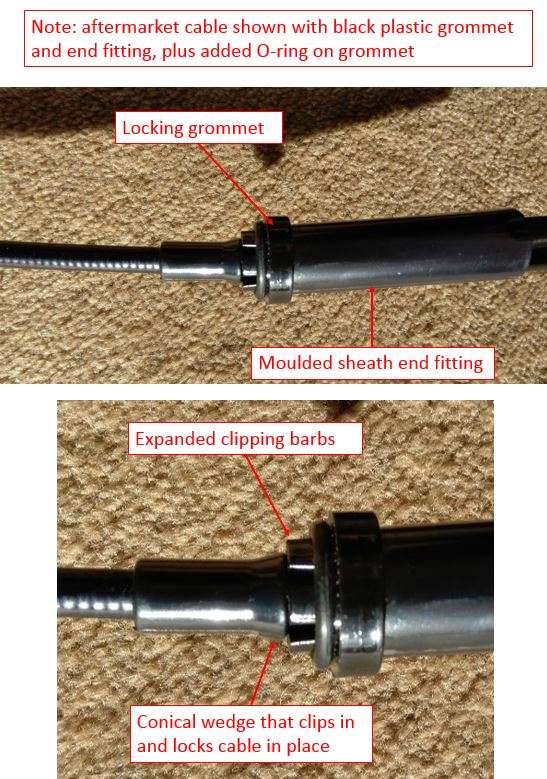
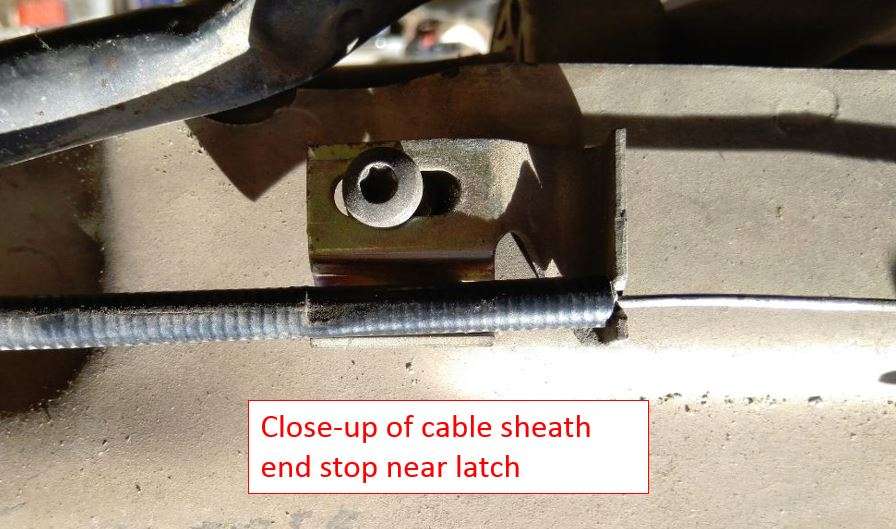
Taking a step back, let’s look at the release cable. The effort required to release the latch at the pull handle is higher than the effort to pull the latch release mechanism at the latch itself. This is due to the mechanics of the cable. First, there is friction in the cable between the cable and the sheath. Second, the cable is not a straight run to the latch – and the more bends in the cable and the sharper the bends, the higher the frictional forces due to additional side loads between the cable and the sheath. The 240 cable is basically a straight run forward from the pull handle to the area forward of the strut tower, where it then takes a gentle bend 90 degrees towards the centre of the car and aims towards the bonnet latch. There are one or two small clamps to hold the cable in place – one just forward of the strut tower and the other just behind the headlamp. From there the cable passes through a rubber grommet in the headlamp/radiator side panel. At the end of the cable sheath, there’s another clamp attached to the bottom of the front end panel. This clamp prevents the cable sheath from moving towards the latch when the cable is pulled. It’s all about the opposing forces balancing out (in this case the cross-car forces between the latch mechanism and the cable sheath). The other critical element for the balancing of forces is the clipping grommet where the cable passes through the dash panel. This grommet is basically a one-way clip that is designed to be assembled into the car and never removed. First, the outer part (the moulded plastic grommet) is pushed from inside the car into the hole in the metal dash panel. The grommet has small clip barbs around its perimeter that snap into the hole. Then the cable is passed through the grommet (again from inside the car). At the handle end of the cable sheath, there is a moulded plastic feature with a conical shape that pushes through the grommet and snaps into place, while locking the barbs on the grommet so it doesn’t release from the panel. Quite simple, and virtually impossible to remove without breaking something! It’s this solid clip lock that reacts the pulling forces in the cable sheath in the fore/aft direction.
If the cable were dead straight, no sheath would be required and you’d be able to simply pull the cable to release the latch. Another option would be to have a small pulley just behind the headlamp, and have two virtually straight runs – one from the handle to the pulley, and one from the pulley to the latch. I suppose if you were in a bind you could rig up something like this, but it isn’t done in practice due to the cost and probably sub-par appearance and durability. In no case should you try to use the middle of the cable sheath to react forces. I’ve seen people put cable ties to hold the sheath to the front panel just behind the headlamp, desperately hoping that the sheath would hold after the grommet was pulled out of the hole in the dash panel. Nope! It won’t work, or if it does, it will probably destroy and kink the coiled wires of the cable sheath in short order. The sheath must act in compression, not tension, hence the critical end stops on the sheath (the dash grommet and the end stop up near the latch).
Lubricating the latch and the secondary RHD pivot will often be enough to free up a problematic cable, and should form part of your yearly (or thereabouts) lubrication scheme. To lubricate the secondary pivot, undo the rear nut on the top of the latch, then undo the pivot bolt from underneath (remove grille first), being careful to note the correct orientation and position of the cam/pivot components. Clean off any corrosion and lubricate with grease. It’s also possible to get some oil down the cable by removing it from the latch and pointing it up (first remove the cable clamps and push it back through the rubber grommet in the headlamp side panel). Then push a length of hose (I use about 100 mm of clear vinyl hose just larger than the cable sheath) over the end of the cable and overlap the sheath and put on a small hose clamp. Then spray some WD40 or other light oil down and work the cable in and out. Then fill the short hose with some oil and let it soak down into the cable. You could also experiment with powdered lubricants like graphite but not sure how you’d go getting any into the cable. Assuming your cable has not come disconnected from the dash grommet, if you’ve done the above steps you should be surprised at how easy it is to release the bonnet! If it’s still a bit too difficult but everything is in good condition, then the bonnet catch pin may be screwed in holding the bonnet down too tight. This can be adjusted in small increments by loosening the large nut at the base of the catch pin, then using a flat-blade screwdriver to lengthen the pin slightly. Don’t loosen the pin too much or the bonnet may rattle or come loose.
Final steps – be sure to lubricate the safety catch pivot pin – it should freely spring back once lifted and released. If not, and the bonnet is not latched properly, the safety catch may not engage and the bonnet could fly open while driving. And as you probably already know, be sure to lubricate all the pivots on the bonnet hinges or your hinges will get so stiff that they bend the bonnet and/or the hinge links. The bonnet should be extremely easy to open and close if the hinges are properly lubricated.
